Have you ever noticed the completely ridicules UI of computers in movies and TV shows?
You rarely see any windowing systems (but that’s ok, the hero never has to switch windows), the fonts and icons are huge (also ok, there’s never anything more complex than 3 text boxes and 2 buttons) except for lists that always display in a grid with 2 points font size (also ok, the hero never needs more than a second to scan the entire list).
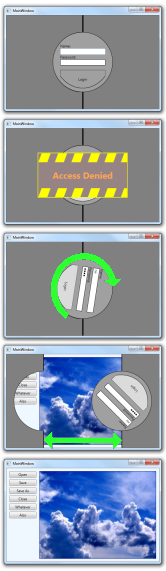
But it sure is dramatic, logging into a secure system looks like opening a safe door, sending or receiving e-mail is accompanied by huge animated envelopes flying on screens and when you delete a file you see it slowly shredded (slowly – because the hero is on his way and has to arrive just in time to stop the deletion).
Today I’m going to give you a movie style login control.
Initially the control will display a user name and password controls inside a round area along with a semi circler login button surrounded by gray “closed doors” (if this was for production I would have used a brushed metal texture instead of gray – but I wanted to keep the download small).
If you try to login with incorrect credentials you will get a scary “access denied” message.
When you enter the correct user name and password the circular “lock” are will rotate and then the “doors” will slide open the reveal the application.
Now, we are all serious software engineers here, so this is going to be a proper WPF control, it’s going to be “lookless” with replaceable templates and it’s going to be fully MVVM friendly.
We start by creating a class, we will call it LoginControl and we will inherit from Control – because that’s were we get the control template support from.
Let’s start with the interface with the control template.
Our control needs a TextBox for entering the user name, a PasswordBox for entering password and a button for actually trying to log in.
There is no cancel button because it’s out of scope for this control (the hero will either successfully log in or be dragged away by evil security guards – he will never close the application).
To accommodate the TextBox we just need a string dependency property that can be bound to the TextBox.Text property (that way the control template writer can also replace the TextBox with a completely different control if needed) – we will call this property LoginName:
public static readonly DependencyProperty LoginNameProperty =
    DependencyProperty.Register("LoginName", typeof(string), typeof(LoginControl));
public string LoginName
{
    get { return (string)GetValue(LoginNameProperty); }
    set { SetValue(LoginNameProperty, value); }
}
The PasswordBox is a little tricky because you can’t data bind to the PasswordBox.Password property, so we will have to access the PasswordBox ourselves, we do that by specifying the control template must have a PasswordBox named PART_PasswordBox, this is called a template part and the convention is the start the name with an uppercase PART_, we specify this using the TemplatePart attribute on the control calss:
[TemplatePart(Name="PART_PasswordBox", Type=typeof(PasswordBox))]
public class LoginControl : Control
{
For the login button we will use a routed command – this will let the template writer use any control that can send commands instead of a button (hyperlink, for example) and thankfully it’s just one line of code:
public static readonly RoutedCommand TryLoginCommand = new RoutedCommand();
Ok, two lines, we also need to use CommandBindings to attach code to this command, we will do it in our constructor (we will see the TryLoginExecute method later):
public LoginControl()
{
    CommandBindings.Add(new CommandBinding(TryLoginCommand, TryLoginExecute));
}
That took care of the data and notifications the template have to send to the control, we also need two notifications from the control to the template: one for failed login attempts and one for successful login attempts.
When the user enters incorrect name or password we want to show a message like “Incorrect user name of password, please check your Caps Lock and try again” (or in the movies “ACCESS DENIED”) and continue, we don’t change the state of the control so a property that can be bound to doesn’t make sense – buy an event does (we use a routed event and set it’s routing strategy to “Tunnel” so it is sent into the control template and not to the parent window).
public static readonly RoutedEvent FailedLoginEvent = EventManager.RegisterRoutedEvent(
    "FailedLogin", RoutingStrategy.Tunnel, typeof(RoutedEventHandler), typeof(LoginControl));
public event RoutedEventHandler FailedLogin
{
    add { AddHandler(FailedLoginEvent, value); }
    remove { RemoveHandler(FailedLoginEvent, value); }
}
When the login is successful we want to run our unlock animation, we could use a property if we want but we will just deal with it the same way as the failed login:
public static readonly RoutedEvent SuccessfulLoginEvent = EventManager.RegisterRoutedEvent(
    "SuccessfulLogin", RoutingStrategy.Tunnel, typeof(RoutedEventHandler), typeof(LoginControl));
public event RoutedEventHandler SuccessfulLogin
{
    add { AddHandler(SuccessfulLoginEvent, value); }
    remove { RemoveHandler(SuccessfulLoginEvent, value); }
}
That’s everything the template needs, but we also need to communicate with the application hosting the control.
First we need a way to ask the application if the user name and password are valid, we will do it with an event (note that this time the routing strategy is “Bubble”):
public class CheckLoginEventArgs : RoutedEventArgs
{
    public string LoginName;
    public string Password;
    public bool LoginSuccessful;
}

public delegate void CheckLoginEventHandler(object sender, CheckLoginEventArgs e);

public static readonly RoutedEvent CheckLoginEvent = EventManager.RegisterRoutedEvent(
    "CheckLogin", RoutingStrategy.Bubble, typeof(CheckLoginEventHandler), typeof(LoginControl));
public event CheckLoginEventHandler CheckLogin
{
    add{AddHandler(CheckLoginEvent,value);}
    remove{RemoveHandler(CheckLoginEvent,value);}
}
But wait, I said this control will be MVVM friendly so we will also add a command options:
public static readonly DependencyProperty CheckLoginCommandProperty =
    DependencyProperty.Register("CheckLoginCommand", typeof(ICommand), typeof(LoginControl));
public ICommand CheckLoginCommand
{
    get { return (ICommand)GetValue(CheckLoginCommandProperty); }
    set { SetValue(CheckLoginCommandProperty, value); }
}
And last but not least, a command so signal that the login was successful in an MVVM friendly way:
public static readonly DependencyProperty SuccessfulLoginCommandProperty =
    DependencyProperty.Register("SuccessfulLoginCommand", typeof(ICommand), typeof(LoginControl));
public ICommand SuccessfulLoginCommand
{
    get { return (ICommand)GetValue(SuccessfulLoginCommandProperty); }
    set { SetValue(SuccessfulLoginCommandProperty, value); }
}
We could also add a bubbling successful login event, but it’s easy enough to attach to the tunneling event in code behind – so we won’t bother.
You may have noticed we wrote a whole lot of code that just defines properties, commands and events but we didn’t write any code that actually does anything, so it’s time to write the actual control logic.
The control logic is ridiculously simple:
- if you have a CheckLoginCommand execute it, otherwise send the CheckLogin event.
- It the command/event indicated the login was successful send the LoginSuccessful event and execute the SuccessfulLoginCommand.
- Otherwise send the FailedLogin event.
or in code:
private void TryLoginExecute(object sender, ExecutedRoutedEventArgs e)
{
    CheckLoginEventArgs args = new CheckLoginEventArgs()
    {
        RoutedEvent = CheckLoginEvent,
        LoginName = LoginName,
        Password = GetPassword(),
    };

    var cmd = CheckLoginCommand;
    if (cmd != null)
    {
        cmd.Execute(args);
    }
    else
    {
        RaiseEvent(args);
    }

    if (args.LoginSuccessful)
    {
        var result = new RoutedEventArgs(SuccessfulLoginEvent);
        RaiseEvent(result);
        var successCommand = SuccessfulLoginCommand;
        if (successCommand != null)
        {
            successCommand.Execute(null);
        }
    }
    else
    {
        ClearPassword();
        var result = new RoutedEventArgs(FailedLoginEvent);
        RaiseEvent(result);
    }
}
There are also the GetPassword and ClearPassword methos we use to access the PasswordBox defined as a template part – note that we have to run correctly also when it doesn’t exist (even if there’s no point to do so in the control).
private string GetPassword()
{
    var pbox = Template.FindName("PART_PasswordBox", this) as PasswordBox;
    if (pbox != null) return pbox.Password;
    return string.Empty;
}
private void ClearPassword()
{
    var pbox = Template.FindName("PART_PasswordBox", this) as PasswordBox;
    if (pbox != null) pbox.Password = string.Empty;
}
And that’s all we need to apply our movie style template.
To see the control template and view the entire animation just download the project here (~20Kb). the control template is in the app.xaml file.
It’s a VS2010 project targeting .net 3.5SP1 but the code is fully compatible with VS2008, I’ve also included the sample executable so you can view the animation without compiling (the correct user name/password are “user”/”1234” without the quotes).
posted @ Tuesday, July 20, 2010 12:24 PM