
| DOWNLOAD TRIAL | TOUR | REVIEWS | BUY NOW | UPGRADE | ON-LINE HELP |
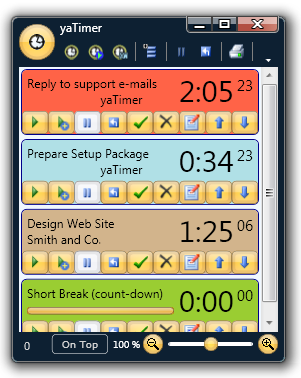
The Task List (Main Window)
This is what you see when you start yaTimer, from this window you do most of your work with yaTimer.
The task list window is divided into three main areas: at the top there’s the title and tool-bar area, most of yaTimer’s task list window is occupied (unsurprisingly) by the task list itself and at the bottom of the task list window you’ll find the status bar.
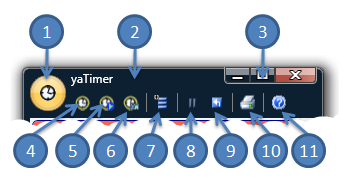
The big round button on the top left (1) opens the main menu, then there’s the title bar (2), you can use it to drag the yaTimer window around just like the title bar of any other program and on the top left you’ll find Vista “Aero” style minimize, maximize/restore and close buttons (3).
When you first install yaTimer those act exactly the same as on any other window but you can customize their behavior from the options window (see “Minimize and Close Behavior”).
The first toolbar button is the “Create New Task” button (4), it will open the task details window with a new empty task, the next toolbar button “Create Running Task” (5) will also open an empty task details window but with the timer already running.
This option is useful when you want to start timing before you know the task details, for example, the phone rings, you don’t know what the customer wants yet but you do know the call is billable time.
The third and final way to create a new task is the “Create Task from Template” button (6), it will open the task details window with a new task already pre-filled with values you defined in the task template, you can create and manage task templates from the main menu (see “Task Templates”).
The “Arrange Tasks in Groups” button (7) changes the task list display to show tasks with the same client, project or color grouped together.
The “Pause All Running Tasks” button (8) will stop all timers, perfect for when you are taking a break and want to stop all timers.
When you click this button it will change into the “Restart Paused Tasks” button, this will restart the same tasks you had running before, perfect for when you return from a break and want to pick up where you left off.
The “Reset All Tasks” (9) button will reset all timers back to zero and all countdowns back to their initial time, this resets the display but does not delete any accumulated time (see “Resetting Tasks”).
This is useful if you want. For example, to start every morning with a “clean slate” and see only the time you spent today.
The “Print Reports” button (10) will take you to the reports window, from there you can view and print the various reports supported by yaTimer.
The last button on the toolbar, “View On-Line Help” (11) will take you to the help table of contents on the yaTimer web site.
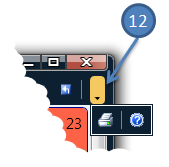
When the yaTimer window is too small for the tool bar a white triangle will appear on the right of the tool bar (12), clicking it will show all the buttons that don’t fit into the window.
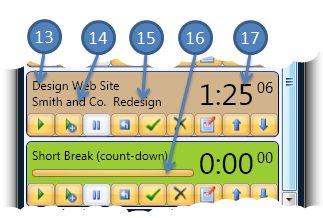
Each task has its own frame, painted in the color you selected in the tasks details window.
The first line in the frame (13) is the task name and in the second line you’ll find the task’s client name (14) and project name (15), for countdowns the client and project names are replaced with a progress bar (16) showing the time remaining on this countdown (the bar starts as full and get’s shorter as the countdown nears zero).
You can see the project and client name of a countdown by hovering your mouse over the task, the task name, client and project will appear in a floating tooltip.
On the right there’s a time display (17) that shows the time since the timer was last reset (see “Resetting Tasks”) or, for countdowns, the time remaining for this countdown.

On the task’s button bar the first two buttons are used to start the timer, the first button (18) will start the timer and stop any other running timers, letting you switch from one task to another, the second button (19) starts the timer without stopping any other timers, allowing you to keep several timers running at the same time.
The third button (20) stops the task’s timer (to stop all timers you can click the “Pause All Running Tasks” button on the main toolbar).
The “Reset This Task” (21) button will rest the timer back to zero or, for countdowns, back to the countdown’s initial time, this does not erase any accumulated timing information (see “Resetting Tasks”).
The “Mark This Task as Complete” button (22) will mark the task as complete and remove it from the task list, you can still view and modify the task from the completed tasks window (including “un-completing” it and returning it to the tasks list), a completed task will still appear in all the reports.
The “Delete This Task” button (23) will delete the task and remove it from the task list, the task can be restored from the deleted tasks window, and deleted tasks do not appear in any of the reports.
The “Edit This Task” button (24) opens the task details window and let you modify the task’s data.
The last two buttons are used to re-order the tasks in the task list, to move the task one position up (25) or down (26), tasks can also be re-ordered by dragging them into their new position.

At the bottom of the task list window you’ll find the status bar.
On the right of the status bar you’ll find the number of running tasks (27), hovering you mouse over the number will show the total number of tasks as well as the number of running tasks.
The “On Top” button (28) toggles the yaTimer window between normal mode, where it can be hidden behind other windows on your screen and on top mode, where the yaTimer window will float above other windows in the system.
The zoom slider (31) let’s you change the tasks size all the way from tiny, so that you can resize yaTimer to take less screen space to huge, so you can maximize the yaTimer window and be able to see the task list from across the room.
To change the zoom you can drag the slider with the mouse, or you can use the "Zoom Out" (30) and "Zoom In" (31) buttons, the percentage near the slider (29) is the current zoom level