WPF Image Viewer Part 7, Rotating the Image with a Transform and More Data Binding Between Controls

This is the final part of the WPF image viewer tutorial: Introduction, Part 1, Part2, Part 3, Part 4Part 5 and Part 6.

So, what are transforms?

This is an extremely short and simplified explanation, like most of the topics I cover in this tutorial you can use this to get started but if you want in-depth information I suggest you but this book.

Transforms are a way to modify how something is rendered to the screen, you can take any control and use transforms to move it, scale it, stretch it, rotate it and more.

There are two ways to apply a transform in WPF, Render Transform and Layout Transform:

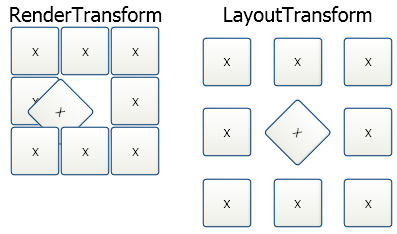
RenderTransform modifies the control after the layout stage, it's more efficient but the layout of the page or window is not affected by the transform.

LayoutTransform modifies the control before the layout stage.

Here is an example, 9 buttons arranged in a 3x3 grid and the middle button has a RotateTransform with the angle set to 45 degrees:

Now, back to our image viewer program, let's start by adding a rotate transform, find the image control displaying the big image:

<Image Source="{Binding ElementName=ImageList,Path=SelectedItem.Image}" />

And a rotate transform to it as a layout transform

<Image Source="{Binding ElementName=ImageList,Path=SelectedItem.Image}">
   <Image.LayoutTransform>
      <RotateTransform Angle="45"/>
   </Image.LayoutTransform>
</Image>

Run the program and see how the image is tilted 45 degrees.

Now obviously it's time the replace the red rectangle with a slider control that we will use to control the transform, replace this:

<Rectangle Fill="Red" DockPanel.Dock="Bottom" Height="20"/>

With:

<Slider Name="AngleSlider" DockPanel.Dock="Bottom" Height="20" Minimum="0" Maximum="360"/>

Now all that's left is to connect the two together, in the RotateTransform line replace Angle="45" With:

Angle="{Binding ElementName=AngleSlider, Path=Value}"

When you run this version you can see the image rotates when we move the slider. So, now we have our ugly but functional WPF application.

That's it, Download a zip with the VS 2005 project.

The tutorial is over, I hope you enjoyed it, I have a lot more cool WPF content to post so if you're interested subscribe via RSS (there's a link on the right side of the blog).

posted @ Thursday, November 15, 2007 5:27 PM

Comments on this entry:

# re: WPF Image Viewer Part 7, Rotating the Image with a Transform and More Data Binding Between Controls

Left by ahmet at 1/6/2009 1:03 AM

this tutorial is incredible!
a lot of thanx!

# re: WPF Image Viewer Part 7, Rotating the Image with a Transform and More Data Binding Between Controls

Left by Peter at 2/21/2009 4:16 PM

Thanks alot i liked your tutorial!

# re: WPF Image Viewer

Left by Festyx at 4/2/2009 7:12 PM

Great content and your writing style is fabulous. Thanks for your example.
- Festyx

# re: WPF Image Viewer Part 7, Rotating the Image with a Transform and More Data Binding Between Controls

Left by Ferdinand at 4/17/2009 10:46 PM

Thx. a lot for writing this tutorial! A very clear step-by-step instruction and my first WPF App works without any problems.

:-)

# re: WPF Image Viewer Part 7, Rotating the Image with a Transform and More Data Binding Between Controls

Left by Allar at 5/28/2009 2:26 PM

Very nice tutorial :)

# re: WPF Image Viewer Part 7, Rotating the Image with a Transform and More Data Binding Between Controls

Left by Rob at 7/6/2009 3:54 AM

Thumbs up, great tut :D

# re: WPF Image Viewer Part 7, Rotating the Image with a Transform and More Data Binding Between Controls

Left by Michiduta at 3/16/2010 3:09 PM

Hello ! I have used this tutorial and then started modifying part of it. I added a button that i use to open a dialog to select a path. My question is: What do I have to modify to make the image list on the left update whenever I select a new path?
I already added a path1 string to the path used in the method from the tutorial, but it only uses the path1 when it starts and then if it modifies later nothing changes.

# re: WPF Image Viewer Part 7, Rotating the Image with a Transform and More Data Binding Between Controls

Left by Lewe at 7/8/2010 12:10 PM

Excellent,quit useful for me~

# re: WPF Image Viewer Part 7, Rotating the Image with a Transform and More Data Binding Between Controls

Left by Sam at 6/27/2011 12:25 AM

Thank you for the article.
Well explained in details and demonstrated.

# re: WPF Image Viewer Part 7, Rotating the Image with a Transform and More Data Binding Between Controls

Left by Betsy at 8/16/2011 3:12 PM

Very Nice article and easy to understand!!! I've read many posts on how to do this and yours was the most informative. Thanks!!!!!

Your comment:


 (will not be displayed)


Please add 5 and 4 and type the answer here: